Auth API Key
- Overview
- Setup and Retrieve Credentials
- Plug Into OCISigner
- Run Test Credentials
- Sign a Request
- Notes
API keys are long-lived credentials for OCI users.
- If you come from AWS, think of this like an IAM user access key workflow.
- If you come from GCP, think of this like a service-account key workflow.
In OCI, API keys are a public/private key pair. The private key is stored on your local filesystem, and OCI clients use that key to sign outgoing HTTP requests. That is why this profile requires a local private key path plus identity metadata.
This page will:
- Walk through where the API key credentials come from in OCI.
- Show how those values map to the OCISigner API Key profile fields.
- Demonstrate Test Credentials.
- Demonstrate signing a normal request.
- In OCI Console, go to Identity & Security and open your identity domain. Identity domains in OCI contain users, groups, and dynamic group principals.

Figure 1. Identity domain list in specific compartment.
- Navigate to "User management" and open the user you want to generate an API key for.

Figure 2. User management in identity domain.

Figure 3. List of users in identity domain.

Figure 4. Specific user details and API Keys tab.
- Generate or upload an API public key for that user.

Figure 5. "Add API key" option.

Figure 6. Download generated API key pair.
- From the config preview, collect:
-
tenancy(Tenancy OCID) -
user(User OCID) fingerprint-
key_file(private key path)
-

Figure 7. OCI config preview showing required fields.
- On local systems, this is commonly represented in
~/.oci/configplus a private key file.
cat /home/kali/Downloads/private_key
-----BEGIN PRIVATE KEY-----
MIIEvAIBADANBgkqhkiG9w0BAQEFAASCBKYwggSiAgEAAoIBAQCwm1euHrT70xz0
[REDACTED]
-----END PRIVATE KEY-----

cat ~/.oci/config
[DEFAULT]
user=ocid1.user.oc1..aaaaa[REDACTED]
fingerprint=c6:da:[REDACTED]
tenancy=ocid1.tenancy.oc1..aaaa[REDACTED]
region=us-phoenix-1
key_file=/home/kali/Downloads/private_key- In OCISigner, create/select a profile and choose Auth Type = API Key.
- Copy values from your OCI config preview (or
~/.oci/config) into the profile. - Click Save.
| Field | Required | Source |
|---|---|---|
| Region | Recommended |
region (required for namespace probe via Test Credentials) |
| Tenancy OCID | Yes | tenancy |
| User OCID | Yes | user |
| Fingerprint | Yes | fingerprint |
| Private Key File | Yes |
key_file or local private key path |
| Key Passphrase | Optional | only if private key is encrypted |

Figure 8. API Key profile populated in OCISigner.
- Click Test Credentials in the profile.
- OCISigner sends a signed probe request to the namespace endpoint and logs the result.
- Review status and see details in Logger.

Figure 9. Test Credentials action in the profile UI.

Figure 10. Test Credentials result summary.

Figure 11. Logger entry for signed credential test request.
- Confirm signing is enabled and the active profile is set correctly.
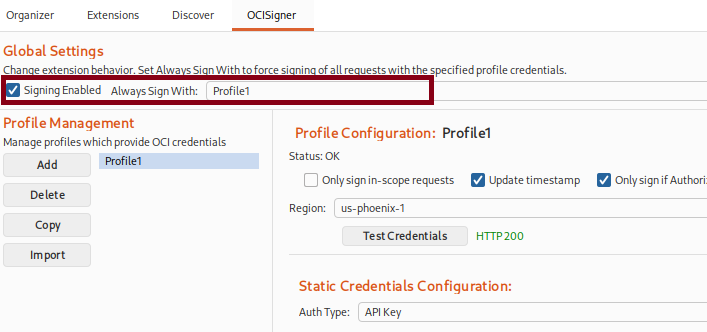
Figure 12. Signing settings enabled before sending traffic.
- Send a request from Repeater or via Proxy.
- Confirm headers are updated and signature is added.

Figure 13. Request sent from Repeater for signing.

Figure 14. Signed request recorded in Logger.
- If you already keep OCI credentials in
~/.oci/config, consider Auth: Config Profile. - You can also import profiles through Import -> Auto instead of manually copying fields. Review Feature Notes
- Never share private keys or raw tokens in screenshots or logs.